PACKS |
BALANCE POCKETS/BAGS & ACCESSORIES |
|
EFFORTLESS RHYTHM Hipbelts, Shoulder Straps & Backlength Backlength Adjustment with Balance Pockets On How to Attach Balance Pockets |
PIVOTING BALANCE POCKETS How to Attach Balance Pockets (models up to 2015) How to Retro-fit 2015-2016+ Balance Pockets to earlier model pack |
|
|
|
|
FEATHERLITE FREEDOM Hipbelts, Shoulder Straps & Backlength |
BALANCE BAGS Attaching Balance Bags to an Aarn Pack |
|
|
|
|
FLOW-MO FRIEND |
BALANCE GEAR RACKS
|
|
|
|
|
GUIDING LIGHT Hipbelts, Shoulder Straps & Backlength |
BEAR CANISTER HOLDER |
|
|
|
|
LIQUID AGILITY |
LASSO LOC STRAPS |
|
|
|
|
LOAD LIMO Hipbelts, Shoulder Straps & Backlength |
SKI STRAPS |
|
|
|
|
MARATHON MAGIC 22,33 |
X FLOW STRAPS |
|
|
|
|
MOUNTAIN MAGIC |
ATTACHING TREKKING POLES |
|
|
|
|
NATURAL BALANCE Hipbelts, Shoulder Straps & Backlength |
UNIVERSAL BALANCE BAG
|
|
|
|
|
NATURAL EXHILARATION |
Converting the Balance Pockets into a Day Pack |
|
|
|
|
PEAK ASPIRATION Hipbelts, Shoulder Straps & Backlength |
|

Aarn backpacks are highly adjustable. This is what makes them the best daypack for women and men alike. Our lightweight day pack enables you to dial in the perfect fit to a degree not possible with other brands. This will most likely mean that for the first day or two of wearing our lightweight day pack or backpack, you will need to experiment with different adjustments and understand what each adjustment does in order to achieve the best fit. General fitting instructions for the larger packs are below. Video instructions for specific models are shown on each product's page so you can create a custom fit on the best hiking daypack available today.
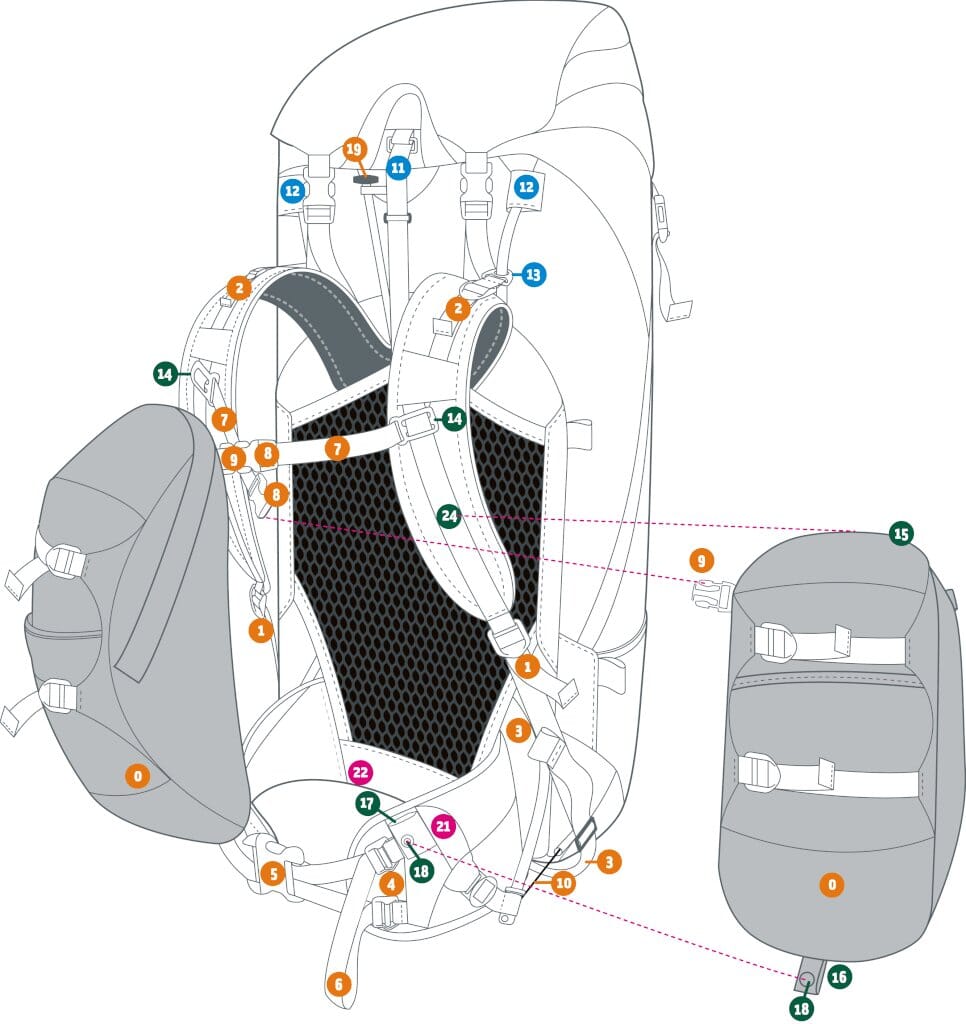
Putting your Bodypack on for the first time (see graphic below)
- Choose the appropriate sized pack for your back-length.
- Loosen shoulder strap webs 1 & 2 and hipbelt webs 4. Lengthen back length by pulling up on navy web, 19.
- Put about 10 kgs of weight in the pack and put it on.
- Place each arm underneath each Balance Pocket and locate the center buckle 5 and clip it together. Keeping your arms underneath the Balance Pockets, lift the hipbelt/ Balance Pockets to the right height on your hips and tighten the hipbelt by pulling the ends of hipbelt loops 6 towards your belly button. The correct height of the hipbelt is when the top of the hipbelt is positioned around your waist and the bottom of the hipbelt wraps around the top of your hips. Positioning the hipbelt at the right height is the foundation for a correct fit. You can fine tune the shaping of the hipbelt by adjusting the tension of the top & bottom straps in buckles 4.
- Clip the right sternum strap buckle 8 into the buckle 9 on the left Balance Pocket and the left sternum strap buckle (8) into the buckle 9 on the right Balance Pocket so the straps cross in an X configuration.
- Tighten the front shoulder strap webs 1.
- Loosen shoulder strap webs 1 & 2 and hipbelt webs 4. Lengthen back length by pulling up on navy web, 19.
- Tighten the top stabilizer straps 2 just enough to bring the top of the pack close to your back.
- Tighten the navy back-length strap 3 to snug the shoulder straps into the shoulders (over tightening will increase weight on the shoulders and decrease weight on the hips).
- Tightening the Multi-flow cord 10 brings more weight onto the front of the hipbelt. Adjust the tension so that there is an even load on the front and back of the hipbelt.
Custom Bending the Balance Pocket Frames
The Balance Pockets should not touch your body. If they do you will need to increase the bend in the wire frames to create the air gap that prevents heat build up.

Frame Shape: Custom bending may be needed on Featherlite Freedom, Peak Aspiration and Earth Glider, which have full-length vertical stays. Here’s how:
Have a friend run their hand down your back behind the pack. If there are no gaps it is a good fit and no custom bending is necessary unless there is a pressure point.
- If there are gaps or a pressure point, ask your friend to note where the top of the frame 11 is in relation to the height of your collar or ears, in other words to a fixed reference point.
- Take the pack off, remove the frame by lifting up the cover flap at the top of the backpanel and pull the frame up out of its slot.
- Have your friend place one frame against the center of your back with the top positioned at the fixed reference point.
- Re-bend the frame to match your back shape.
- Carefully slide the frame back in the top slot, then through the web slot at the back of the shoulder straps, then into the web sleeve in the lower back behind the mesh backpanel. Close the top cover velcro.
Precision Tuning the Hipbelt Size and Shape
Our Pelvic-Form hipbelts can be adjusted in angle and length at both the front and the back. To check the fit, put the pack on and tighten the hipbelt at the correct height.
- Note whether the pressure is tighter at the top or bottom of the hipbelt. Tightening the top of tensioning loop 6, snugs and moulds the top of the hipbelt around your waist and over the top of your hips. Tightening the bottom of tensioning loop 6 tightens the bottom of the hipbelt around your hips.
-
Note whether the grey stretch panel 21 is over the front point of your hipbone. If the stretch panel 21 is forward of the front edge of your hipbone, the hipbelt needs shortening; if behind, it needs lengthening. Notice by how much.
To adjust the hipbelt, you must separate the hipbelt from its framesheet. To access, release the bottom corners of the mesh backpanel 22 by undoing the velcro tabs. Now, separate each hipbelt end from the framesheet.
*To shorten the hipbelt, reposition the hipbelt further in (keeping the framesheet and hipbelt velcro in line).
*To lengthen the hipbelt, reposition the hipbelt further out (keep the framesheet and hipbelt velcro in line).
-
Now note whether the hipbelt tension is even at the middle seam of the hipbelt and the bottom edge. If the bottom edge is digging in, (more likely if you are a woman with distinctly flared hips), then angle the hipbelt ends up slightly before closing the velcro.
Re-connect the mesh corner tabs and put the pack back on. Re-check the fit and the comfort. If necessary, readjust so that the match is perfect.
Attaching Balance Pockets to your Pack
Shoulder strap attachment:
- Slide the sternum adjustors 14 to the top of the 25 mm grey webs.
- Slip the toggle 15 at the top of the Balance Pocket onto the O Ring 24 below the sternum adjuster.
Hipbelt attachment:
Slip the frame extension 16 at the bottom of the Balance Pocket into the hipbelt holster 17. Close the metal snaps 18.
Have questions about making our lightweight day pack the perfect fit? Give our team a call or contact us through our website today.
Converting the Balance Pockets into a Day Pack:
- Lay the shoulder straps flat so you can have the chest strap right way up. The straps with the spring clips should be at the top; insert them into the inner-most top tabs and close the clips.
- Clip the two balance pockets together using the side buckles at top and bottom.
- Slide the bottom hooks to the tabs at the bottom of the pockets.
- Put the pack on and adjust the settings of the top and bottom webs in their respective buckles so that the chest strap sits at a comfortable height across your chest.
See also:
Packing - Optimizing to Reduce Strain and Energy Consumption
USING INSTRUCTIONS & GUIDELINES
Correct weight distribution of the load makes a huge difference to the comfort of your pack. Its more important than the weight itself in reducing the forces acting on the body. To achieve the optimum weight distribution, you must get the feel of the weight/volume ratio of each piece of equipment. For example, a 1.5 kg. sleeping bag will have a low weight/volume ratio. A 1.5 kg. bag of raisins will have a high weight/ volume ratio.
For optimum comfort, items with the highest weight/volume ratio should be high and close to your back (backpacks), or low and in front (Bodypacks).
With a Bodypack, the lightest items go at the top of the pack, with medium weight items below. We want to bring the center of the gravity of the load down as well as in, in order match the center of gravity of the body. This will reward you with the brilliant balance and agility.
We recommend putting your heaviest most compact items in the Balance Pockets, plus items you need to access quickly . If its a choice between the 2, counter balance comes first. As you use up heavy items like food on a trip, keep transferring the weight forward to keep the pockets full.
Water is your heaviest item so it is placed as far forward as possible - in the mesh pockets on the front of the Balance Pockets. We recommend using 2 light drink bottles, one in each pocket to keep the weight balanced. Drink from each alternately to maintain the balance. Rectangular Yoghurt bottles are light, cheap and easily replaceable. In the mesh pockets they are easy to access to drink from and to refill (you don't have to take the pack off). We use 2 small volume bottles when the water requirements are less, 2 larger volume bottles in drier conditions. A hydration bladder on the other hand is easy to access to drink from but fiddly and time consuming to fill and reinsert in the pack. However 2 small bladders will work well if packed in the mesh front pockets of the Balance Pockets.